Your sponge filter works tirelessly behind the scenes, transforming toxic waste into harmless compounds through an intricate microscopic city of beneficial bacteria. Yet this humble piece of foam represents one of the most misunderstood maintenance tasks in aquarium keeping. Clean it too aggressively, and you risk crashing your nitrogen cycle. Neglect it too long, and it becomes a nitrate factory that chokes your tank’s health.
This 2026 guide cuts through the confusion with evidence-based techniques that protect your biological filtration while maximizing mechanical performance. Whether you’re running a single betta tank or managing a breeding operation with dozens of sponges, these ten expert tips will revolutionize your maintenance routine and stabilize your aquatic ecosystems for years to come.
Top 10 Sponge Filters
Detailed Product Reviews
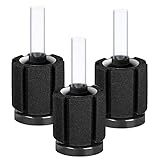
1. AQUANEAT 3 Pack Aquarium Bio Sponge Filter Breeding Fry Betta Shrimp Nano Fish Tank (Small up to 10Gal)
Overview:
This three-pack of small sponge filters from AQUANEAT is designed for aquariums up to 10 gallons, making it ideal for nano tanks, betta habitats, and fry rearing setups. Each filter measures 2.0 inches in diameter and 4.75 inches tall, providing mechanical and biological filtration while producing gentle currents that won’t harm delicate fish or shrimp.
What Makes It Stand Out:
The triple-pack configuration offers exceptional value for hobbyists maintaining multiple small tanks. The soft sponge material safely traps debris without endangering small fish, while the air infusion chamber creates fine bubbles that boost oxygen solubility. Its minimal suction power virtually eliminates the risk of fish being pulled into the filter, a critical feature for breeding operations.
Value for Money:
At a per-unit cost significantly lower than purchasing individual filters, this pack is economical for setting up several tanks simultaneously. Comparable single units retail for nearly half the pack price, making this an intelligent choice for breeders, stores, or enthusiasts with multiple nano setups. The durability ensures months of reliable service before replacement.
👍 Pros
- Excellent multi-pack value; safe for fry
- Shrimp; simple installation
- Maintenance; gentle water flow; enhances oxygenation; compact footprint fits small tanks
Cons: Requires separate air pump (not included); limited to tanks under 10 gallons; sponges need regular rinsing to prevent clogging; may not provide sufficient filtration for heavily stocked tanks.
Bottom Line:
Perfect for breeders and nano tank keepers needing reliable, fish-safe filtration across multiple setups. The convenience and cost savings make this three-pack a smart investment for small-scale operations.
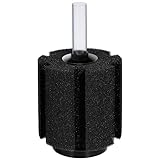
2. AQUANEAT Aquarium Sponge Filter Breeding Fry Betta Shrimp Nano Fish Tank 4pcs (Large up to 60Gal)

Overview:
This four-pack of large sponge filters accommodates tanks up to 60 gallons, serving serious breeders and multi-tank setups. Each unit measures 4.5 inches in diameter and 8.0 inches tall, delivering robust mechanical and biological filtration for larger breeding operations, maternity tanks, and fry rearing systems.
What Makes It Stand Out:
The bulk quantity caters to high-volume applications, offering consistent filtration quality across multiple large tanks. The substantial sponge size provides extensive surface area for beneficial bacteria colonization while maintaining the gentle flow characteristics essential for protecting small fish. The air-driven design ensures reliable performance without creating dangerous currents.
Value for Money:
For large-scale breeders or fish stores, the per-unit price represents significant savings compared to buying individually. Each filter costs roughly 25% less than comparable singles, making this pack financially attractive for operations requiring uniform equipment. The investment pays dividends in reduced equipment costs across multiple setups.
👍 Pros
- Bulk packaging ideal for multiple tanks; generous filtration capacity; safe for delicate species; simple maintenance; excellent oxygenation; durable construction
Cons: Large size may not fit all tank configurations; requires powerful air pump for optimal performance; overkill for tanks under 20 gallons; sponges demand regular cleaning in heavily stocked environments.
Bottom Line:
An excellent choice for commercial breeders or dedicated hobbyists with several medium-to-large tanks. The bulk value and proven performance justify the investment for serious fishkeeping operations.
3. AQUANEAT 4 Pack Double Bio Sponge Filter, for Fry, Betta, Shrimp, Nano, Aquarium Fish Tank

Overview:
This four-pack features double sponge filters designed for tanks up to 20 gallons, offering enhanced biological filtration through dual sponge layers. Each unit measures 4 inches long by 1.8 inches wide by 6.25 inches tall, with individual sponges measuring 1.8 inches in diameter and 3.0 inches tall.
What Makes It Stand Out:
The dual-sponge configuration doubles the surface area for beneficial bacteria, potentially improving biological filtration efficiency. This design is particularly beneficial for tanks with higher bioloads or for establishing robust nitrogen cycles in breeding setups. The compact vertical orientation maximizes filtration in limited space.
Value for Money:
While priced slightly higher than single-sponge alternatives, the double filtration capacity may offset the cost for tanks requiring superior biological processing. However, the preparation requirement reduces immediate usability value. For dedicated breeders managing multiple 10-20 gallon tanks, the four-pack structure remains economical.
👍 Pros
- Dual sponges increase biofiltration; compact design fits various tanks; gentle flow suitable for fry; multi-pack convenience
Cons: Requires 8-24 hours of soaking before use; some units may not fully expand; confusing product dimensions; vacuum-sealed packaging is inconvenient; needs separate air pump.
Bottom Line:
Best for patient hobbyists prioritizing biological filtration capacity. The pre-soaking requirement is a notable drawback, but the dual-sponge design benefits tanks needing extra biological support.
4. AQUANEAT Aquarium Bio Sponge Filter Breeding Fry Betta Shrimp Nano Fish Tank (Large up to 60Gal)
Overview:
This single large sponge filter serves tanks from 40 to 60 gallons, providing substantial filtration for sizable breeding operations or community tanks housing small species. Measuring 4.5 inches in diameter and 8.0 inches tall, it delivers the same performance as bulk packs without requiring purchase of multiple units.
What Makes It Stand Out:
Offering individual purchase flexibility, this filter suits hobbyists needing just one large unit rather than surplus equipment. The generous sponge volume supports extensive bacterial colonies while maintaining the gentle, fry-safe flow characteristic of air-driven sponge filters. Its robust construction handles demanding applications.
Value for Money:
Though carrying a higher per-unit cost than multi-pack equivalents, this single filter eliminates waste for those requiring only one unit. The price remains competitive with other large sponge filters, and avoiding unused equipment represents practical economy. For single large tank owners, this targeted purchase makes financial sense.
👍 Pros
- Ideal capacity for 40-60 gallon tanks; soft sponge protects fish; straightforward installation; reliable oxygenation; no excess equipment
Cons: Single unit less economical than bulk buys; requires separate air pump; large footprint may dominate small tanks; regular cleaning necessary.
Bottom Line:
The perfect solution for hobbyists with one large tank who need powerful yet gentle filtration. It delivers professional-grade performance without the commitment of a multi-pack purchase.
5. Pawfly 3 Pack Aquarium Sponge Filter Quiet Betta Fry Shrimp and Small Fish Foam Filter for Tiny Fish Tank up to 10 Gallon
Overview:
Pawfly’s three-pack of miniature sponge filters targets the nano tank segment, accommodating 5-10 gallon setups. Each filter measures 2 inches in diameter and 4.8 inches tall, providing mechanical and biological filtration for bettas, shrimp, and fry while emphasizing quiet operation and ease of maintenance.
What Makes It Stand Out:
The brand specifically highlights quiet aeration and fine sponge filtration, addressing common concerns about noise and debris capture in small tanks. Clear maintenance instructions—rinsing only in aquarium water every 2-4 weeks—demonstrate user-focused design. The compact dimensions match industry standards for nano applications.
Value for Money:
Competitively priced against AQUANEAT’s offerings, this pack delivers similar specifications with added emphasis on operational quietness. The three-unit configuration provides flexibility for multiple small tanks or backup replacements. While requiring separate air pump investment, the per-filter cost remains attractive for budget-conscious nano enthusiasts.
👍 Pros
- Quiet operation emphasis; fine sponge material; clear maintenance guidelines; competitive pricing; suitable for very small tanks
Cons: Brand less established than AQUANEAT; still requires air pump; limited to 10 gallons maximum; fine sponge may clog faster; no unique features versus competitors.
Bottom Line:
A worthy alternative to mainstream brands, particularly for noise-sensitive users. The clear instructions and quiet performance make it an excellent choice for beginners or bedroom aquarium setups.
6. Pawfly Aquarium Bio Sponge Filter Quiet Betta Fry Shrimp and Small Fish Foam Filter for Fish Tanks up to 20 Gallons, 3 Pack

Overview:
The Pawfly 3-Pack sponge filter provides mechanical and biological filtration for 10-20 gallon tanks. Measuring 2″ x 6.2″, these air-powered units are perfect for breeding betta fry, shrimp, and small fish. The fine sponge traps debris while protecting delicate inhabitants and maintaining crystal-clear water through gentle, effective filtration.
What Makes It Stand Out:
The triple-pack configuration offers exceptional value for multi-tank setups. The ultra-fine sponge density prevents even tiny fry from being harmed while maximizing filtration surface area in minimal space. Its compact cylindrical design is ideal for densely planted nano tanks where every inch matters, making it perfect for breeding operations.
Value for Money:
Costing less than many single filters, this 3-pack delivers under $5 per unit, making it highly economical for breeders. While an air pump is required separately, the long-lasting sponges provide months of service with proper maintenance. For aquarists managing several small tanks, the bulk packaging eliminates repeat purchases.
👍 Pros
- Superior livestock safety
- Whisper-quiet operation
- Simple cleaning
- And multi-pack convenience. The sponge effectively hosts beneficial bacteria while polishing water
👎 Cons
- Include requiring a separate air pump
- Limited flow for tanks over 15 gallons
- And potential floating if not fully saturated during installation
Bottom Line:
Perfect for breeders and shrimp keepers managing multiple small tanks. The Pawfly 3-Pack combines safety, efficiency, and economy in a no-frills package that excels at protecting vulnerable aquatic life while maintaining pristine water conditions.
7. DVHEY 100-120 Gal Large Aquarium Sponge Filter with Air Stone and Ceramic Media,2 Pack Quiet Fish Tank Filters fit Breeding Fry Betta Shrimp Fish Tank

Overview:
The DVHEY 2-Pack delivers heavy-duty filtration for large 100-120 gallon aquariums. Each unit combines high-density sponge with ceramic media, providing dual-stage mechanical and biological filtration. Designed for breeding operations, these air-powered filters create gentle flow safe for fry and shrimp while processing substantial waste loads in spacious environments.
What Makes It Stand Out:
The integration of ceramic bio-media alongside premium sponge creates a robust bacterial colony far exceeding standard sponge filters. The bubble diffuser design with included air stones produces micro-fine bubbles, maximizing oxygen exchange while minimizing noise. This comprehensive kit includes 8 feet of airline tubing, suction cups, and check valves—everything except the air pump itself.
Value for Money:
While pricier than basic sponges, this 2-pack justifies cost through superior filtration capacity and included accessories. For large breeding tanks, avoiding separate media purchases saves $15-20. The durable construction withstands rigorous cleaning, offering years of service. Considering each filter serves 100+ gallons, the per-gallon cost remains competitive with premium alternatives.
👍 Pros
- Massive biological capacity
- Whisper-quiet operation
- Complete accessory package
- And safe flow for delicate species. The honeycomb sponge structure resists clogging better than standard designs
👎 Cons
- Include substantial size requiring ample tank space
- Potential over-filtration for smaller setups
- And the air pump’s separate purchase
Bottom Line:
Ideal for serious breeders managing large-scale operations. The DVHEY filters combine professional-grade filtration with thoughtful accessories, making them the top choice for 100+ gallon breeding, shrimp, or community tanks demanding reliable, gentle filtration.
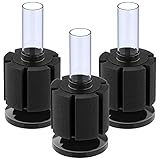
8. AQUAPAPA Bio Sponge Filter for Betta Fry Aquarium Fish Tank Up to 60 Gallon Each, 3-Pack (L)

Overview:
The AQUAPAPA 3-Pack provides versatile filtration for medium-sized aquariums up to 60 gallons per unit. Each 4.5″ x 8″ sponge filter delivers mechanical and biological filtration through air-driven operation. Suitable as primary filters, secondary units, or pre-filters for external systems, these adaptable sponges serve breeding tanks, community setups, and saltwater applications equally well.
What Makes It Stand Out:
The triple-pack configuration offers unmatched flexibility, allowing aquarists to filter three separate tanks or combine units for larger systems. The generous dimensions provide substantial surface area for beneficial bacteria while maintaining gentle flow perfect for fry and shrimp. Included airline accessories simplify installation across multiple tanks without additional purchases.
Value for Money:
This 3-pack delivers excellent mid-range value, typically costing less than $10 per unit. For aquarists with several medium tanks, the bulk packaging eliminates repeat purchases. While lacking ceramic media, the large sponge volume compensates with ample biological capacity. The included tubing and valves add $5-8 of value per tank compared to buying separately.
👍 Pros
- Versatile application
- Generous size
- Multi-pack convenience
- And suitability for fresh or saltwater. The sponge effectively protects small livestock while polishing water
👎 Cons
- Include no ceramic media for enhanced bio-filtration
- Requiring separate air pump purchase
- And bulky appearance in smaller aquascapes
Bottom Line:
A smart choice for hobbyists with multiple medium tanks. The AQUAPAPA 3-Pack balances capacity, versatility, and economy, serving admirably whether filtering breeding colonies, shrimp tanks, or as backup units for larger systems.
9. DVHEY 2 Pack 60-70 Gal Aquarium Sponge Filter with Air Stone and Ceramic Filter Media Quiet Fish Tank Bio Filter for Breeding Fry Shrimp Betta Fish Tank

Overview:
The DVHEY 2-Pack targets medium-sized breeding tanks of 60-70 gallons with dual-stage filtration. Each unit combines high-density sponge and ceramic media, delivering powerful mechanical and biological processing. Air-powered operation ensures gentle, safe water circulation for fry, shrimp, and betta colonies while maintaining excellent water quality in mid-range aquariums.
What Makes It Stand Out:
This kit bridges the gap between basic sponges and large-scale systems, offering professional features like ceramic bio-media and bubble-diffusing air stones typically reserved for larger models. The comprehensive accessory package includes 8 feet of airline tubing, suction cups, and check valves for both units—eliminating separate hardware purchases.
Value for Money:
Positioned as a mid-premium option, this 2-pack offers strong value through included ceramic media and accessories. The per-unit cost remains competitive with basic large sponges while delivering superior biological capacity. For 60-70 gallon breeders, avoiding separate media and tubing purchases saves approximately $20-25 overall.
👍 Pros
- Dual filtration technology
- Whisper-quiet operation
- Complete installation kit
- And optimal sizing for medium tanks. The honeycomb sponge resists clogging while protecting delicate livestock
👎 Cons
- Include limited to 60-70 gallon capacity
- Requiring separate air pump
- And potential size constraints in smaller aquascapes
Bottom Line:
Perfectly suited for dedicated breeders with medium-sized operations. The DVHEY filters deliver professional-grade features without overkill, making them ideal for 60-70 gallon shrimp, betta, or fry tanks requiring reliable, enhanced biological filtration.
10. AQUANEAT 6-Pack Pre-Filter Sponge for Aquarium Shrimp Fry Fish Tank Filter 0.8” Intake, Replacement Foam Cover

Overview:
The AQUANEAT 6-Pack provides essential protection for small aquarium inhabitants by covering filter intakes. Measuring 3.2″ x 1.8″ with a 0.8″ center hole, these sponges stretch to fit intakes up to 1 inch diameter. Designed for HOB filters, powerheads, and canister intakes, they prevent shrimp, fry, and snails from being sucked into filtration systems while adding mechanical pre-filtration.
What Makes It Stand Out:
The six-pack quantity offers exceptional value for aquarists with multiple filters or tanks. Unlike standalone filters, these specifically address the critical problem of livestock injury while extending primary filter life by capturing debris before it reaches the main unit. The elastic foam accommodates various intake sizes within the specified range.
Value for Money:
Extremely cost-effective at typically under $2 per sponge, this pack represents significant savings compared to brand-specific pre-filters. By preventing livestock loss and reducing main filter maintenance frequency, they pay for themselves quickly. The durable foam withstands repeated cleaning, providing months of service per unit.
👍 Pros
- Universal compatibility
- Excellent livestock protection
- Extended primary filter life
- And bulk value. The sponge maintains good flow while trapping particles
👎 Cons
- Include requiring existing filtration
- Potential sizing mismatches
- And needing regular cleaning to prevent flow reduction. They arrive compressed and require rinsing to expand
Bottom Line:
An indispensable accessory for any community tank housing small fish or invertebrates. The AQUANEAT 6-Pack delivers cheap insurance against livestock loss while improving overall filtration efficiency—essential equipment for responsible aquarists.
Understanding Your Sponge Filter’s Ecosystem
Before diving into cleaning techniques, you need to understand what’s actually living inside that porous foam. A mature sponge filter isn’t just a mechanical barrier—it’s a thriving metropolis of nitrifying bacteria, detritus worms, microcrustaceans, and other microorganisms working in delicate harmony.
The Biological Balance Within
The outer layers of your sponge typically house heterotrophic bacteria that break down solid waste, while deeper zones harbor the precious nitrifiers (Nitrosomonas and Nitrospira species) that convert ammonia to nitrite and then to nitrate. This stratification means cleaning methods that homogenize the sponge or strip layers indiscriminately can demolish months of bacterial colonization. The density of bacteria can reach 10^8 cells per cubic centimeter in a well-established filter, making it more biologically active than many high-tech canister filters.
Mechanical vs. Biological Filtration Zones
Visualize your sponge in three distinct zones: the surface crust (mechanical pre-filtration), the middle matrix (transitional biology), and the core (stable nitrification). The surface traps visible debris and algae, turning brown or green quickly. The middle sections appear darker but remain porous, while the core should maintain its original coloration if properly maintained. Understanding this architecture informs why gentle surface cleaning preserves deeper biological zones.
Why Proper Cleaning Matters More Than You Think
The difference between a thriving tank and a perpetual problem often lies in sponge maintenance philosophy. Your approach directly impacts dissolved oxygen levels, pH stability, and the overall resilience of your nitrogen cycle.
The Risks of Over-Cleaning
Over-enthusiastic cleaning causes “new tank syndrome” in established aquariums. When you remove more than 30% of bacterial biomass in one session, ammonia spikes can occur within 12-24 hours. Fish exhibit gasping, clamped fins, and lethargy as toxin levels rise. The bacterial colony requires 7-14 days to recover fully, during which your livestock experiences chronic stress that weakens immune systems and invites disease.
Consequences of Under-Cleaning
Conversely, sponges left unchecked for 3+ months become anaerobic zones where beneficial aerobic bacteria die off. The trapped organic matter leaches phosphates and nitrates back into the water column, fueling algae blooms. Flow rate diminishes by up to 60% as pores clog, reducing oxygen exchange and creating dead spots where detritus accumulates. Eventually, the sponge can become a source of hydrogen sulfide—that rotten egg smell indicates toxic gas production that can wipe out entire tanks.
Pre-Cleaning Preparation: The Essential Checklist
Rushing into sponge maintenance without preparation invites disaster. A systematic approach ensures you protect your livestock while maximizing cleaning efficiency.
Gathering Your Supplies
Assemble everything before touching the filter: a dedicated 5-gallon bucket (never used for chemicals), dechlorinated water matching tank temperature, nitrile gloves to protect your skin and prevent contamination, a turkey baster for precision work, and a flashlight for inspection. Keep a spare sponge or bag of bio-media nearby for emergencies. Never use soaps, detergents, or scrub brushes—these leave residues that decimate bacterial colonies.
Timing Your Maintenance
Schedule cleaning 2-3 days after your regular water change, never immediately before. This ensures stable parameters and gives you a baseline for post-cleaning testing. Avoid cleaning during fish illness outbreaks, medication treatments, or within one week of adding new livestock. Morning sessions allow all-day observation of fish behavior, letting you catch stress responses early. For breeding tanks, time cleaning away from spawning cycles, as the disturbance can trigger egg eating or fry abandonment.
Tip #1: Never Use Tap Water Directly
This cardinal rule cannot be overstated. Municipal water treatment facilities add chlorine and chloramine specifically to kill microorganisms—including your precious nitrifying bacteria.
Chlorine’s Devastating Impact
Chlorine at typical tap water concentrations (0.5-2.0 ppm) destroys bacterial cell membranes through oxidation within seconds of contact. A single rinse under the tap can reduce your bacterial population by 70-90%. Worse, chloramine (a chlorine-ammonia compound) persists longer and continues killing bacteria for hours after exposure. Even “well water” users aren’t safe—many private wells contain heavy metals or fluctuating pH that shocks bacterial colonies.
Creating Safe Cleaning Water
Prepare cleaning water 24 hours in advance using a triple-dose of dechlorinator for the bucket volume. This super-dechlorinated water provides a safety margin for the cleaning process. For ultimate protection, match the pH within 0.2 units and ensure GH/KH values are identical to your tank. Advanced keepers can use old tank water from water changes for cleaning—it’s already parameter-matched and contains some bacteria, though it’s less effective at removing stubborn debris.
Tip #2: The Gentle Squeeze Technique
The physical action of cleaning determines bacterial survival. Your hands are both the tool and the potential weapon against your filter’s biology.
Why Aggressive Wringing Kills Bacteria
Twisting or wringing a sponge like a dishcloth shears bacterial colonies from foam pores and crushes the delicate biofilm matrix. This matrix functions like a city infrastructure—destroying it means bacteria must rebuild from scratch. Aggressive compression also forces air into anaerobic zones, oxidizing compounds that can release toxins. Studies show that sponges cleaned with twisting motions take 40% longer to re-establish full nitrification capacity.
The Proper Motion and Pressure
Submerge the sponge completely in your prepared water. Use both hands to gently compress and release in a rhythmic pumping motion—like giving CPR to the filter. Apply only enough pressure to expel cloudy debris water, stopping when the expelled water runs clear rather than crystal clear. The goal is removing loose detritus, not achieving pristine foam. Limit each sponge to 15-20 gentle squeezes. The foam should retain some brown tint—that’s your active bacteria, not dirt.
Tip #3: Clean in Batches for Stability
Aquarium stability trumps perfection every time. This principle becomes critical when maintaining multiple tanks or large systems with several sponges.
The 50% Rule for Multi-Tank Systems
Never clean more than half your total sponge filtration capacity in one 24-hour period. If you run two sponges in a 40-gallon breeder, clean one sponge this week, the other next week. For rack systems with ten tanks, clean five sponges on Saturday, five on the following Saturday. This ensures continuous biological processing capacity. The bacterial load in the uncleaned sponges compensates for the temporary reduction, preventing any ammonia or nitrite readings above 0.25 ppm.
Staggering Your Maintenance Schedule
Create a spreadsheet tracking each sponge’s last cleaning date. Rotate through your system methodically, cleaning each sponge every 3-4 weeks but never simultaneously. For heavily stocked grow-out tanks, reduce the interval to 2 weeks but maintain the stagger. This approach creates a “rolling” maintenance cycle where some filtration is always at peak efficiency while other portions undergo gentle cleaning. The result is parameter graphs that show flatlines instead of roller coasters.
Tip #4: Temperature Matching is Critical
Thermal shock is the silent killer of bacterial efficiency. A temperature swing of just 5°F during cleaning can cause bacterial dormancy or death.
Thermal Shock and Bacterial Die-Off
Nitrifying bacteria have optimal activity ranges (77-86°F for tropical species). When exposed to water more than 3°F cooler or 5°F warmer, they undergo heat shock response, shutting down metabolic processes. This can last 24-48 hours, during which ammonia goes unprocessed. Repeated thermal stress selects for less efficient bacterial strains, gradually reducing your filter’s overall capacity by up to 30% over six months.
Simple Temperature Testing Methods
Use an infrared thermometer gun to check both tank water and cleaning bucket temperature before starting—they should read within 2°F of each other. For precision, submerge a digital thermometer probe in both sources. If temperatures differ, slowly acclimate the sponge by floating it in a bag of tank water for 10 minutes before cleaning. In winter, warm your cleaning bucket near the tank overnight. During summer, keep cleaning water in a cool basement, never in a hot garage.
Tip #5: The Bucket Method vs. In-Tank Cleaning
Two primary schools of thought exist for where to perform the actual cleaning. Each has distinct advantages depending on your setup and goals.
Pros and Cons of Each Approach
Bucket Method: Removes the sponge from the tank, allowing thorough inspection and preventing debris from settling back into the aquarium. However, it exposes bacteria to air (potentially drying surfaces) and temperature fluctuations. Risk of dropping or contaminating the sponge increases.
In-Tank Cleaning: Keeps the sponge submerged and temperature-stable throughout. Debris removed simply settles elsewhere in the tank for later vacuuming. Limited space restricts cleaning motion, and you can’t inspect the sponge’s core easily.
When to Choose Which Method
Use the bucket method for heavily clogged sponges (flow reduced >50%) or when treating tank-wide algae issues—you don’t want to redistribute spores. In-tank cleaning suits weekly maintenance touches and small tanks where removing the sponge would disturb aquascaping. For breeding tanks with tiny fry, always clean in-tank to prevent fry loss during sponge removal. Advanced keepers often hybridize: quick in-tank rinses weekly, bucket method monthly for deep cleans.
Tip #6: Inspect While You Clean
Your sponge tells a story if you know how to read it. Cleaning time is inspection time—never multitask or rush this process.
What Wear and Tear Looks Like
Examine foam pore structure under a bright light. Healthy foam shows uniform pores with slight discoloration. Deteriorating foam exhibits crumbling edges, compressed “dead zones” where pores have collapsed, and thin spots that allow debris to pass through unfiltered. Check for calcification (white, crusty buildup) in hard water tanks, which reduces porosity by up to 40%. The plastic housing should have no cracks, and airline connections must fit snugly without air leaks.
Early Warning Signs of Failure
Black patches indicate anaerobic decomposition producing hydrogen sulfide—immediate action required. Greasy, foul-smelling slime suggests heterotrophic bacterial overgrowth, often from overfeeding. If the sponge disintegrates in your hands during gentle squeezing, it’s past due for replacement. Sudden increase in cleaning frequency needed (weekly vs. monthly) signals the foam’s porosity has degraded, trapping debris more aggressively. Document these observations in your maintenance log to track degradation trends.
Tip #7: Know Your Sponge Type
Not all foam is created equal. Pore size and material composition dictate cleaning frequency and technique adjustments.
Pore Size and Cleaning Frequency
Coarse sponges (20-30 PPI – pores per inch): Trap large debris but allow smaller particles through. Clean every 2-3 weeks using vigorous (but still no-twist) squeezing. They clog slower but provide less mechanical polish.
Medium sponges (30-45 PPI): The sweet spot for most applications. Clean every 3-4 weeks with moderate pressure. These balance mechanical and biological filtration optimally.
Fine sponges (45+ PPI): Trap even microscopic particles but clog rapidly. Clean weekly with extremely gentle pressure, focusing only on surface layers to protect the dense bacterial colony within.
Material Differences (Foam vs. Reticulated)
Standard polyurethane foam degrades over 12-18 months, becoming brittle and losing pore structure. Reticulated foam (often marketed as “pond filter” material) lasts 3-5 years but harbors bacteria less densely due to larger pore size. Reticulated sponges can tolerate slightly more aggressive cleaning because bacteria colonize throughout the structure rather than in layers. Always check manufacturer specifications—some “antimicrobial” foams contain chemicals that inhibit bacterial growth, defeating the purpose entirely.
Tip #8: The Debris Inspection Clue
The color, texture, and quantity of expelled debris provide a diagnostic window into your tank’s overall health and feeding practices.
What the Gunk Tells You About Tank Health
Brown, fluffy debris: Normal detritus from fish waste and decomposing plant matter. Indicates healthy system function.
Green, slimy material: Algae overgrowth—consider reducing photoperiod or nutrient levels. May signal phosphate >2 ppm.
Uneaten food particles: Overfeeding alarm. Reduce portions by 25-50% and consider feeding rings to limit waste.
White, stringy mucus: Bacterial bloom or fish health issues. Test water parameters immediately and observe fish for disease signs.
Color Coding Your Concerns
Track the water color during cleaning sessions. First squeeze produces dark brown water—expected. If subsequent squeezes remain dark after 15+ pumps, your sponge is overdue. Pink or reddish tint suggests cyanobacteria presence. Black, foul-smelling sludge indicates anaerobic pockets—your sponge may be too thick or flow rate too low. Use this visual data to adjust feeding, stocking, or flow rates before problems escalate.
Tip #9: Post-Cleaning Monitoring
The 48 hours following sponge maintenance are critical. Your actions during this window determine whether the cleaning was successful or destabilizing.
Water Parameter Testing Timeline
Test ammonia and nitrite at 6, 24, and 48 hours post-cleaning. Use liquid test kits for accuracy—test strips lack the precision needed to detect early spikes. Any reading above 0.25 ppm requires immediate action: dose Prime or similar detoxifier, reduce feeding by 50%, and consider a 25% water change. pH should remain stable within 0.2 units. KH drops indicate bacterial consumption of carbonates during recovery—supplement if KH falls below 3 dKH.
Behavioral Signs of Stress in Fish
Watch for gasping at the surface (oxygen depletion from bacterial bloom), clamped fins (ammonia irritation), or hiding behavior (stress). Healthy fish show curiosity about the newly cleaned sponge, often pecking at it for dislodged food particles. If fish avoid the filter output or huddle at the opposite end of the tank, your cleaning was too aggressive. In reef tanks, watch corals—polyp retraction or tissue recession indicates water quality issues. Document behavioral changes alongside parameter readings to refine your technique.
Tip #10: When to Replace vs. Clean
Even perfect maintenance can’t make a sponge immortal. Knowing when to retire filter media prevents catastrophic failure.
The Lifespan Expectancy
Track sponge age from installation date. Standard foam: replace at 18 months maximum, regardless of appearance. Reticulated foam: 36 months. Signs that replacement is overdue include permanent compression (won’t rebound after squeezing), crumbling edges, persistent foul odor even after cleaning, or failure to maintain water clarity despite proper flow. Keep a “birthday log” for each sponge—when in doubt, replace proactively during a scheduled water change, not after a failure.
Transitioning to New Media Safely
Never replace a sponge entirely without seeding the new one. Run both sponges simultaneously for 4-6 weeks, positioning the new sponge downstream of the old to collect bacterial slough-off. Alternatively, squeeze the old dirty sponge directly into the new sponge’s pores before installation, inoculating it immediately. For critical tanks, place the new sponge in a mature tank for 2 weeks before swapping. After installation, treat the tank as “new” for monitoring purposes—test parameters daily for one week, then every other day for two weeks.
Frequently Asked Questions
How often should I really clean my sponge filter?
Most tanks thrive with cleaning every 3-4 weeks. Heavily stocked tanks or fine-pore sponges need attention every 2 weeks. New tanks (<3 months old) require only gentle surface swishes monthly to protect developing bacteria. Always prioritize flow rate over appearance—clean when flow drops by 25%, not when the sponge looks dirty.
Can I clean my sponge filter too gently?
Yes. If you never expel the deep detritus, anaerobic zones develop. The key is removing loose debris while preserving biofilm. If the expelled water never runs semi-clear after 15 gentle squeezes, you’re being too gentle. The sponge should feel lighter and regain some of its original color while still appearing “seasoned.”
What if I accidentally used tap water once?
Don’t panic. Immediately dose the tank with a double amount of dechlorinator, focusing near the filter output. Add bacterial supplement directly to the sponge pores. Monitor parameters every 12 hours for 3 days. Most established tanks recover within 48 hours if the exposure was brief. The real damage comes from repeated tap water exposure, not a single mistake.
Why does my sponge smell bad even after cleaning?
Persistent foul odor indicates deep anaerobic bacteria producing hydrogen sulfide. This happens when debris is compacted too deeply for gentle cleaning to remove. Perform a more aggressive bucket cleaning, squeezing 25-30 times. If odor remains, the sponge is likely permanently colonized by anaerobes and should be replaced. Check that your air pump provides adequate flow—undersized pumps create dead zones.
Can I use old tank water to clean my sponge?
Absolutely. It’s the gold standard for bacterial safety. However, it’s less effective at removing greasy buildup because it already contains dissolved organics. Use old tank water for routine maintenance, but every third cleaning, use fresh dechlorinated water for a deeper clean. This hybrid approach maximizes both bacterial preservation and mechanical restoration.
How do I clean a sponge filter in a tank with shrimp or fry?
Use the in-tank method exclusively to prevent losing tiny livestock hidden in pores. Squeeze gently with one hand while holding a fine net over the sponge with the other to catch escapees. Clean in sections—do half the sponge this week, half next week—to always provide shelter. Consider adding a pre-filter sponge that you clean more often, leaving the main filter undisturbed for longer intervals.
Should I turn off my air pump during cleaning?
Yes, always disconnect the airline before removing the sponge. This prevents back-siphoning water into your pump and stops air bubbles from disturbing debris you’re trying to contain. For in-tank cleaning, leaving the pump on can help flush debris, but it makes controlled squeezing difficult. The bucket method is cleaner and safer for the pump.
Can I add beneficial bacteria supplements directly to the sponge?
Smart practice. After cleaning, while the sponge is still wet, pour liquid bacterial supplement directly into the pores before reinstalling. The bacteria adhere better to clean surfaces. Do this weekly for new tanks, monthly for mature systems. This “top-off” ensures diversity in your bacterial colony and speeds recovery after any maintenance disturbance.
What’s the best way to clean multiple sponges in one tank?
Never clean them simultaneously. If your tank uses two sponges for redundancy, clean one completely, wait 48 hours, then clean the second. This maintains 75%+ biological capacity at all times. For large canister filters with multiple sponge stages, clean the coarse mechanical sponge one week, the medium sponge the next week, and the fine polishing sponge the third week. This rolling schedule prevents any parameter fluctuations.
How do I clean a sponge filter while traveling?
Prepare a “travel cleaning kit”: pre-mixed dechlorinated water in a sealed container, disposable nitrile gloves, and a large ziplock bag. Perform in-tank cleaning to avoid spills. If you must use tap water at your destination, treat it with extra dechlorinator and dose the tank immediately upon return home. Consider installing a second sponge 2 weeks before travel so you can leave one untouched during your absence, ensuring biological stability while you’re away.