If the thought of discarded fish waste swirling around your glass-scraped substrate makes your eye twitch, you’re already halfway to owning a homemade gravel vacuum. Aquarium veterans may swear by store-bought siphons, yet many of the same benefits—precision suction, flow-rate control, and bio-layer-friendly pick-up—can be engineered from parts already lounging in your garage. As hobbyists move into 2025, the focus is shifting toward sustainable, customizable gear that respects both hard-earned budgets and sensitive aquatic ecosystems.
Below, you’ll find a deep-web treasure of know-how that walks you through every bend, valve, and pressure calculation required to fabricate a DIY gravel vacuum that rivals commercial devices. Whether you’re rescuing delicate fry from a pile of detritus or tackling the stubborn mulm coating a planted carpet, this roadmap leaves nothing to guesswork.
Top 10 Homemade Aquarium Gravel Vacuum
Detailed Product Reviews
1. Tetra Water Cleaner Gravel Siphon for Aquariums, Easily Clean Freshwater Aquariums
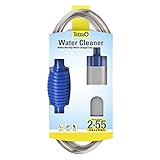
Overview: The Tetra Water Cleaner is a simple, manual gravel siphon built for routine aquarium upkeep, targeting tanks as large as 55 gallons with a flood-free setup that minimizes hassle.
What Makes It Stand Out: Its pared-down design—primed by a single squeeze bulb—eliminates electricity, noise, and moving parts, giving beginners a foolproof method to complete monthly 30 % water changes without disturbing fish or décor.
Value for Money: Under ten dollars, it replaces buckets, cups, and elbow grease; replacement parts are universal, operating cost is zero, and durability outlasts several tanks, making this an exceptionally low-risk investment.
👍 Pros
- Near-zero learning curve
- Silence
- Portability
- And no filters to rinse
👎 Cons
- Are slow flow requiring physical lifting of water
- Limited reach in deep tanks
- And the absence of fine-filtration for crystal-clear results
Bottom Line: If you need a frills-free, dependable gravel vac for modest freshwater setups, Tetra’s siphon is unbeatable for the price.
2. FOUSIUTIM Electric Aquarium Gravel Cleaner, 6-in-1 Automatic Fish Tank Cleaner Vacuum – 32W 530GPH Powerful Gravel Vacuum for Aquarium, Sand Washer (Blue with Temperature Sticker)

Overview: FOUSIUTIM’s 32 W electric gravel cleaner packages six functions—vacuuming, water changes, debris removal, shower, and circulation—into a blue wand powered by a 110 V/530 GPH pump.
What Makes It Stand Out: The IP68 waterproof motor delivers hospital-grade suction, while an adjustable telescopic arm fits nano to 100-gallon tanks; the tool’s snap-on filter sponge and anti-clog suction cup keep debris out of the pump without ever clamping on gravel.
Value for Money: At fifty bucks the kit throws in a priming bulb, flow clips, and lifetime bilingual support. Replacement sponges cost pennies, and the motor uses only 32 W during quick ten-minute sessions—costing cents per month.
👍 Pros
- Potent suction
- Silent operation
- And hands-free bucket clips
👎 Cons
- Include a non-waterproof power switch requiring vigilance
- Occasional wand-tip jamming in coarse gravel
Bottom Line: For hobbyists who crave electric convenience without paying boutique prices, this is the sweet-spot workhorse.
3. QZQ Aquarium Gravel Cleaner [2025 Edition] Vacuum Fish Tank Vacuum Cleaner Tools for Aquarium Water Changer with Aquarium Thermometers Fish Net kit Use for Fish Tank Cleaning Gravel and Sand
![QZQ Aquarium Gravel Cleaner [2025 Edition] Vacuum Fish Tank Vacuum Cleaner Tools for Aquarium Water Changer with Aquarium Thermometers Fish Net kit Use for Fish Tank Cleaning Gravel and Sand](https://m.media-amazon.com/images/I/51S+2N20RtL._SL160_.jpg)
Overview: The 2025 QZQ kit gives budget-minded aquarists a 7-piece Swiss-army set anchored by a hand-powered siphon that swaps 30 % of water in minutes.
What Makes It Stand Out: A squeezable bellows primer replaces pumps; an in-tube mesh cage stops gravel or fry from escaping while a modular hose array, scraper blade, net, and temperature stickers cover every chore from algae scrubbing to fish rescues.
Value for Money: Less than twenty dollars buys a complete ecosystem: two extension tubes, clips, algae scraper, fish net, and even spare suction pads. No batteries mean zero running costs for years.
Strengths and Weaknesses: Strengths include silent operation, fully submersible pump casing, and generous accessory bundle. Downsides are moderate hand fatigue during large-tank drains and no built-in filtration.
Bottom Line: Perfect for nano-to-mid-size tanks where silence and versatility outweigh raw power.
4. AKKEE Aquarium Vacuum Gravel Cleaner, 36W Fish Tank Gravel Cleaner Vacuum for Water Changer 8 in 1 Multifunctional with Timed Off Waterproof Wash Sand Water Filter Circulation Aquarium Vacuum Cleaner

Overview: AKKEE’s flagship electric vacuum wields 36 W of digital muscle across eight functions—water changes, vacuuming, filtration, turtle shower, algae scraping, timed shutoff, and adjustable power—anchored by a five-layer media stack.
What Makes It Stand Out: A smart controller lets you dial suction from gentle (19 W fry-safe) to turbo (36 W for planted substrate), while preset 60-/30-/10-minute auto-shutoff prevents floods. The telescopic tube doubles to 1.5 m, handling tanks over 120 cm deep.
Value for Money: Seventy dollars nets a rugged power unit, 1.5 m drain hose, washable multi-stage filter, dual sand heads, and a 24 V safe-dive adapter—comparable setups in other brands start above $100.
👍 Pros
- Precision control
- Spotless polishing
- And turtle-shower orbit mode
👎 Cons
- Are the non-waterproof switch placement
- Taller learning curve for first-timers
Bottom Line: If you run large, diverse systems and want one device to replace half your gear, AKKEE earns its premium tag.
5. UPETTOOLS Aquarium Gravel Cleaner – Electric Automatic Removable Vacuum Water Changer Sand Algae Cleaner Filter Changer 110V/28W

Overview: UPETTOOLS delivers a sleek electric vacuum controlled by a 28 W motor moving 1 700 L/H across six functions—wash, drain, filter, shower, and variable flow—packaged in cobalt blue with an extending 47-inch wand.
What Makes It Stand Out: Punchy suction drains a 180-gallon tank in half an hour yet throttles down with the built-in valve, protecting delicate plant roots or fry; titanium-finished nozzles shrug off saltwater corrosion, while the 3-year warranty eclipses every rival.
Value for Money: At thirty-six dollars you get flagship flow rates, a telescopic tube for tanks up to four feet deep, plus lifetime free consumables—turning a mid-range price into bargain territory.
👎 Cons
- Are the standard non-waterproof rocker switch
- Absence of felt media for polishing water to ultra-clear levels
Bottom Line: Dollar-for-flow the best value in electric gravel vacs; buy with confidence.
6. hygger 360GPH Electric Aquarium Gravel Cleaner, 5 in 1 Automatic Fish Tank Cleaning Tool Set Vacuum Water Changer Sand Washer Filter Siphon Adjustable Length 15W
Overview: The hygger 360GPH Electric Gravel Cleaner is a 5-in-1 tool designed for hassle-free aquarium maintenance. Extending from 11.4″ to 40.5″, it suits everything from small freshwater tanks to tall reef setups. The UL-listed 15 W pump delivers 360 GPH, letting you vacuum, change water, rinse sand, and polish debris—no buckets or hose-tangling required.
What Makes It Stand Out: An independent inline switch keeps your hands dry while four modular brush heads hit corners hard. Head suction starts at just 2″ of water, draining down to 0.3″—ideal for low-profile aquariums and fry rearing tubs. Reusable filter-sponge cartridges return cleaned water during wash, cutting waste by half compared to traditional siphons.
Value for Money: At $35.99 it’s cheaper than the average electric cleaner, yet feels like a “plug-in pit crew” with included 2 m hose, adapters, and extension tubes. Replacement sponges cost pennies further boosting long-term savings.
Strengths and Weaknesses: Quick setup, aggressive corner scrubbing, and dry-hand controls are standout pros. On the downside, the pump is slightly louder than some rivals, and the rigid tube sections may spin loose in very deep tanks if not fully threaded.
Bottom Line: Recommended for busy aquarists looking for an affordable electric all-rounder that collapses several tools into one lightweight, UL-proven package.
7. Aquarium Siphon Pump Gravel Cleaner, Fish Tank Vacuum Gravels Cleaning Kit, Manual Water Changer with Air Push Button, Aquariums Sand Clean Set, Hose for Suck Manure Wash Sand

Overview: Seaoura’s manual siphon kit swaps batteries for elbow-grease and an ingenious airbag primer. With extension combos reaching 35″, it tackles gravel washing, spot scraping, and waste extraction across nano to 55 gal tanks—no cords or filters to service.
What Makes It Stand Out: The dual-chamber airbag builds prime in three effortless squeezes, while a built-in strainer guards curious fry. A spring-loaded clip locks flow mid-vacuum so you can lift away for detritus pickup without restarting siphon.
Value for Money: Priced at $22.88, it’s one of the lowest-cost kits that still ships with multiple heads and an extra-wide 1.5 m hose. That easily beats hand-crank models costing twice as much.
👎 Cons
- Include annoying splash back when the intake clogs
- The lightweight plastic clip feeling fragile with heavy gravel
Bottom Line: A no-frills bargain for planted-tank keepers who value simplicity and already perform smaller, frequent water changes.
8. AKKEE Aquarium Vacuum Gravel Cleaner Handle Control 8 in 1 Multifunctional 36W Fish Tank Gravel Cleaner Vacuum for Water Changer Wash Sand Water Filter Circulation Aquarium Clean Timed Off Waterproof

Overview: AKKEE’s 8-in-1 electric gravel vacuum is the “Swiss-army knife” of aquarium tools. The 36 W pump offers three power levels, telescoping 1.5 m tubes, and a 5-layer reusable filter—everything from turtle showers to algae scraping is covered.
What Makes It Stand Out: Handle-integrated controls let you dial suction (19–36 W) on the fly, while timed shut-off (10/30/60 min) adds safety for unattended use. The stackable filter cartridge sports sponge, bio balls, and carbon—removing 98 % of fine detritus without water loss.
Value for Money: At $69.99 it’s pricey, but replaces vacuum, media reactor, and manual scraper; the upfront cost evaporates when you realize nothing else is needed to keep a 0 ppm ammonia record.
👎 Cons
- Worth noting when kids “help.”
Bottom Line: Ideal for aquascape enthusiasts and turtle parents wanting pro-grade versatility with one-button ease.
9. Suness Electric Aquarium Vacuum Gravel Cleaner: 36W Fish Tank Cleaner Vacuum with Strong Suction for Water Change Wash Sand Algae Cleaner Water Shower and Water Circulation, Timed Off

Overview: The Suness 36 W Electric Gravel Cleaner ups the ante with three suction levels, 3-stage filtration, and timed auto-shutoff for tanks up to 75 gal. Supplied heads deal with sand, algae, and waste alike, all driven by an ultra-quiet 36 W pump.
What Makes It Stand Out: Patented telescoping tube (15 cm adjustment) plus 1.5 m hose adapts to different depths without kinking. Reusable sponge/bio-filter/activated-carbon media claims 99 % impurity reduction, returning crystal water mid-clean.
Value for Money: At $69.99 it matches feature-rich rivals yet supplies bonus algae scraper heads and a generous hose—effectively a 2-for-1 deal versus buying separate tools.
Strengths and Weaknesses: One-click flow toggle and timer make water changes faster; switch noise could be lower under peak load. Like similar models, keep the external switch clear of splash zones.
Bottom Line: A reliable, future-proof choice for hobbyists ready to automate every chore—bet-orchid levels included.
10. Carefree Fish Aquarium Small Gravel Cleaner 6Ft Hose Silicone Airbag Fish Tank Water Changer Gravel Vacuum Adjustable Length ABS(for 3~8Gal Tank)

Overview: Carefree Fish delivers a pint-sized siphon purpose-built for 3–8 gal nano setups. Its silicone priming bulb and 6 ft drain hose make “squeeze, drain, done” the only routine, using nothing but gravity and a gentle cascade.
What Makes It Stand Out: Compact ABS cup fits under low-evaporation lids; 5 mm anti-gravel guard lets fine sand through while blocking curious shrimp. Silicone squeeze-ball survives thousands of compressions, and a 6 ft hose reaches the kitchen sink from the bedroom shelf.
Value for Money: At $12.99 it’s simply the cheapest functional gravel cleaner available, yet still includes flow valve and fixture clamp—accessories often missing from $30 kits.
Strengths and Weaknesses: Featherweight, tool-free setup and no electrical risk are ideal dorm dwellers. Downsides: short intake limits taller tanks, and the narrow cup glugs when gravel is densely packed.
Bottom Line: Perfect starter gear or backup vac for nano enthusiasts who want an ultra-portable, rubber-duck budget solution.
Why Build Your Own Gravel Vacuum Rather Than Buy One
The aquarium aisle is stocked with purpose-built siphons that seem enticing until you crack open the accessory catalog. Each add-on—brass tap, check valve, or macro-fiber prefilter—jacks the price into boutique territory and locks you into proprietary sizing. When you craft your own rig, the bill of materials fits your setup, not the other way around. You’ll also skip single-use plastics, allowing you to swap in food-grade tubing that resists algae smear and can be sanitized between tanks.
Essential Physics Behind Siphon Flow and Air-Lift Systems
Understanding the fluidic plumbing that makes debris obediently rise up a plastic straw is the first layer of confidence. A siphon relies on atmospheric pressure differential: once the outlet sits lower than the inlet, gravity pulls the column of water downward, creating a slight vacuum that drags tank water along for the ride. Air-lift systems instead mix rising bubbles with the water column, reducing perceived density and pushing extracted waste skyward. Knowing these principles lets you decide how much lift you actually need for 55, 125, or even 220-gallon footprints.
Defining Target GPH for Your Specific Tank Size
Aim for 3-4 complete tank turnovers per cleaning session if the goal is detritus disruption, but throttle back to 1-2 if delicate mosses or shrimp reside at the substrate edge. Use the standard gallons-per-hour calculation of (tank volume × desired turnovers per session ÷ cleaning time) to avoid stripping away essential mulm or overhead biofilm. For reference, a 37-gallon bowfront needs roughly 75 GPH for a slow 20-minute psyche, whereas a 180-gallon terraced Dutch scape might demand 400+ GPH to reach remote corners before plant respiration peaks. Proportional head height matters as well—each vertical foot of tube adds ~0.43 PSI resistance, altering the real-world flow rate.
Balancing Gentle Suction with Powerful Waste Lift
Too much enthusiasm and you’ll suck newly-arrived Bucephalandra or Corydoras eggs—too little and mulm remains smugly glued. Restrict flow at the intake’s slit geometry (narrower grooves pull in water faster yet keep stray shrimp safe) and incorporate an inline micro-valve or kink clamp you can feather in real-time. Back this up with concentric mesh guards at different micron ratings; the outer shell can trap bulky plant needles while the inner cylinder allows fines to enter for external collection.
Tools & Raw Materials You’ll Need at the Workbench
No specialty CNC machines required. Gather food-grade vinyl tubing (corrugated walls resist kinks), a sharp hobby knife, 220 grit sandpaper, PVC elbows or 90-degree barbs, electrician’s tape, and a malleable acrylic sheet. For air-lift fuel, you’ll want chevron-style airstones (tough, low-clog) plus a weighted airline holder. Finally, keep a small tube of cyanoacrylate rated aquarium-safe; its wicking action seals micro-gaps you won’t see until the drip test.
Step 1: Mapping Out the Ideal Tube Length and Diameter
Too long and the siphon droops like an overfilled water hose, adding friction losses; too short and your catch bucket winds up balancing on the tank rim. Assemble the substrate-to-destination vertical rise first—add three hand-widths as a snip buffer—then slide on the gravel chamber. For inner diameter, 1/2 inch (12.7 mm) is the Swiss-Army size: nimble enough for nano-tanks yet tolerant of debris clumps without blockage. Diameter shrinkage of 15% along the water path boosts velocity and helps push fines outward, so taper slightly if aggressive mulm plumes are inevitable.
How to Measure Tank Depth and Rim Height Accurately
Hook a metal ruler over the rim and eye the glass thickness; premium acrylic lids may rise an extra 8 mm above the water lip. Subtract the gravel depth (plant substrates compress 8-10%) to avoid digging into pearlite hardpan under your Monte Carlo. Mark tubing accordingly with a pencil; that mark is your cut line for the inner siphon stick.
Step 2: Cutting Precision Intake Slots with Zero Friction
Intake shape is where most DIY builds clot. CNC-style laser kerfs are overkill; instead, use a fine-tooth hacksaw blade secured in a bench vice. Rotate the PVC pipe end while gently pressing downward to carve four roughly 2 mm-wide slots every 45 degrees. Chamfer the edges with sandpaper to avoid micro-scratches on delicate sand-sifting gobies. Smooth interior burrs with a micro-scaled cylindrical file to encourage laminar flow.
Preventing Buckling and Wall Collapse During Slotting
Clamp the pipe between two smooth wooden blocks to absorb lateral stress while you work. Cut at low RPM with intermittent coolant (simple dish soap solution) to maintain structural integrity; overheated plastic warps inward and narrows the inner cavity, killing flow. A wipe test—pass cloth through and watch for snag points—confirms you’ve avoided obstruction.
Step 3: Creating a Watertight Gravel Guard Without Clogs
Gravel guards stop the dreaded “pebble avalanche,” but most commercial cones turn into clogged spaghetti strainers. Instead, heat-form a 25 mm acrylic crescent into a cylindrical shield. Drill staggered 1 mm perforations at opposing angles; debris slips through via eddy currents, yet substrate stones bounce off. Spot-weld (with methylene chloride) a caret-shaped inner guard offset 6 mm from the primary cage. The offset creates a swirling chamber where debris stratifies while heavier granules sink back.
Step 4: Integrating an Adjustable Flow Valve for Precision
Inline thumb valves mounted near the tube outlet let you taper the draw smoothly, but threaded bulkheads scream industrial-grade. Thread slots into a soft silicone sleeve instead; the sleeve collapses under gentle pressure, reducing inner cross-section without stress points. Coat the outer circumference with heat-shrink to resist kinking. Over five cleaning cycles, you’ll refine the squeeze sweet spot that balances shrimp safety with digester waste elimination.
Step 5: Building a Solid Vacuum Siphon Priming System
This is where physics nostalgia meets present-day materials. The glugging two-hand shake priming technique belongs in 2003; a janky one-way check valve coupled to a repurposed 5 ml syringe solves suction instantly. Drill a 3 mm starter hole eight inches from intake and epoxy the check valve inline; pull the syringe, water fills, gravity takes over. A second hole capped with a small rubber stopper lets you vent air back out without breaking suction—a micro-bleed for fine-tuning.
Techniques to Minimize Water Waste During Priming
Orient the drip end into a secondary catch jug instead of directly into your carpet, or recycle prime water into potted houseplants—nitrate gold for monsteras. A bike pump pre-charge to 3 PSI inside the drip bucket can squeeze an extra 150 ml of “lost” water back into the tank, perfect when dosing trace ferts to a Wagwag-style Wabi-Kusa build.
Step 6: Establishing an Air-Lift Conversion for Fines Extraction
Air-lift isn’t just for protein skimmers. Add a 2.5 mm micro-bubbler inside the gravel intake assembly; the rising bubble cloud entrains colloidal detritus more efficiently than naked suction alone. Bubbles also strip dissolved organics, cutting down on film buildup around lily pipes. Output volume rises 25-30%, so shorten your active cleaning window proportionally for same-bio-load maintenance.
Correct Stone Positioning and PSI Calibration Tricks
Mount the stone precisely at the local centroid—roughly 70 mm from siphon tip—to create an even bubble curtain. PSI sweet spot lands between 1.8 and 2.2; higher pressure creates turbulent pulsing that sends plant fragments into orbit. Use a cheap pressure gauge on the airline splitter; markets distribute these as CO₂ accessories, but they calibrate just as well for miniature air pumps.
Step 7: Reinforcing the Vacuum Tube Wall Against Kinks
Vinyl walls fatigue as they snake over tank corners—crevice-splitting UV rays from open-top setups accelerate brittleness. Slip a short length of stainless-steel braided cable sheath along the critical 12-inch flex zone nearest the intake. It acts like an internal stent, letting you twist the vacuum aggressively under driftwood shelves without crimping. Post-bend, the memory-less braid relaxes to original curvature, preventing permanent kinks.
Step 8: Testing the Flow Pattern with a Simple Dye Calibration
Drop 0.5 ml of food-grade methylene blue at the siphon opening; the dye trajectory outlines a von Kármán vortex downstream of the gravel guard. Watch for asymmetrical columns or unwanted suction on plant blades. If dye “hooks” back into the micro-valve, widen the bypass hole by 0.5 mm increments until flow is laminar. Once symmetrical, mark your final adjustment depth in silver Sharpie for future reference.
Step 9: Troubleshooting Leaks and Siphon Breakage Mid-Clean
Mid-session panic is the fastest route to ruined carpet pads. Rule number one—hold finger over the outflow for three seconds; if internal pressure stables, it’s a tiny intake leak rather than catastrophic rupture. Patch with aquarium-safe superglue scraped into a razor-sliced channel. For crumbling PVC threads, wrap three passes of PTFE tape clockwise under tension, screw the fittings tight, and cure for 30 minutes upside-down to ward off capillary creep.
Step 10: Post-Clean Maintenance & Longevity Pro Tips
After each gravel purge, run a 1:50 bleach solution through the entire line for 60 seconds, then chase with a triple flush of dechlorinated water. Hang the vacuum vertically on suction cups to encourage drainage and nullify residual chlorine. Every six months, re-sand the intake slots; micro-burrs enlarge under abrasion and invite hairline cracks. An occasional silicone bead refresh inside the gravel guard seam doubles lifespan and prevents glue fatigue from ammonia off-gassing.
Safety Precautions for Both You and Your Livestock
Wear nitrile gloves to avoid contact with cyanobacteria toxins during mulm removal. Switch off the heater 5 minutes early—surging cold water near hot glass creates ballistic thermal shock; switches are cheap but heater tubes are not. Finally, never rely on hand-made valves to maintain return flow when refilling—gravity always wins. Clamp the vinyl shut or close the tank’s permanent bypass before stepping away.
Avoiding Common DIY Pitfalls Hobbyists Encounter
From rogue drip cords to scratched acrylic shielding, mistakes snowball unless you catch them early. Don’t underestimate wall collapse from over-tightened hose clamps; soft vinyl needs gentle support, not death-grip compression. Another rookie mistake: aligning intake slots clockwise when your dominant hand favors backhand motions. The asymmetry strains wrist posture and encourages fatigue—flip guard orientation 180° for ergonomic comfort.
How to Decide Between HOB or Canister Filter Integration
For dedicated tank networks, consider plumbing the vacuum’s outflow into a planted HOB tray or pre-filter sponge chamber. This shaves post-clean water change volume while recycling nutrient slurry back into the biological ring. Avoid pressing directly into a micron-locked canister, though—the sudden debris swarm clogs floss within minutes and overworks pump motors.
Rapid-Start Checklist Before You Begin Syphoning
- Double-check tube length against tank height on dry land.
- Prime the vacuum in a fresh bucket of treated water to heat-soak tubing and soften kinks.
- Inspect all fittings for micro-cracks under bright LED light.
- Dial flow valve to 75 % lever travel, adjust downward after test-shot.
- Remove clamp or seal only when drip path is confirmed—and never stand barefoot in water-spill zones.
Understanding Flow Rate and Head Height Correlations
Even seasoned engineers fudge this relationship. Flow degrades linearly with vertical lift but logarithmically with tube length—meaning long horizontal runs hurt more than single tall bends. A classic rule: every additional 10 inches of vertical lift drops effective GPH by 8 %, while every 100 inches of horizontal friction drops it by 15 %. Account for internal diameter squared—the cross-sectional area scales influence exponentially. This interplay determines nozzle velocity, the decisive factor between gentle lifting of snail eggs and unwantedU-turning of foreground stems.
Budget vs. Premium Material Trade-Offs Explained
Bargain PVC elbows bought at big-box hardware stores can leech organotin stabilizers into acidic water after one year, whereas NSF-rated Schedule 40 is designed for potable systems and carries zero plasticizer migration risk. Premium silicone tubing costs 3× more but tolerates 300 % stretch before rupture and resists algae keratinization inside the bore. If you’re running 5 tanks, mid-tier materials pay for themselves after the third teardown; for a single display, thrift-level DIY is acceptable as long as re-inspection happens every 9-10 months.
Frequently Asked Questions
1. Can I use 3D-printed PLA parts for the gravel vacuum intake?
PLA softens above 60 °C and is bio-degradable; stick with PETG or ABS specifically labeled potable-safe for consistent longevity.
2. How often should I dunk the entire tube in a bleach solution?
Once every 1-2 months suffices for heavily stocked tanks; lightly stocked biotopes stretch to quarterly dips assuming no bacterial blooms are visible.
3. Why does my siphon stop mid-way during a water change?
Usually a tiny leak introduced at elbow joints; pressurize with your mouth and listen for air whistles, then trace with soapy water.
4. Is brass hardware safe for sensitive shrimp species?
Long-term brass exposure leaches copper; coat all threads with a food-grade epoxy barrier or switch to 316 stainless-steel barbs.
5. Can I convert my sand-sifting vacuum to work for bare-bottom fry grow-out?
Absolutely—remove the gravel guard entirely, insert a 200-micron mesh sleeve at the intake slit, and lower flow via the inline valve.
6. How do I calculate tubing diameter for a 450-gallon display with 8 ft head height?
Use the hydraulic equation for laminar flow; in layman terms, bridge to 3/4 inch inner diameter to mitigate 0.5 PSI per foot losses, then insert a ball-valve for modulation.
7. My air-lift only bubbles sporadically—what gives?
Checkstone micro-clogs caused by protein film drizzle; backflush the stone outdoors with brief 120-psi air bursts and rinse under dechlorinated water.
8. Is RO/DI water needed during final rinse after bleach?
RO/DI prevents residual chlorine tails but isn’t mandatory if you triple-flush; any bottled dechlor works provided you follow the 3× rule.
9. Will this setup damage plant-feeder root tabs?
Suction pulls surface detritus, not buried tabs, if guard intake clearance maintains at least 1/2 inch off substrate during sweeps.
10. At what point do I retire tubing and start fresh?
Replace the vinyl tube if it ghosts white from UV degradation forms, develops a white calcium film inside that can’t be scrubbed, or shows micro-cracks under finger pressure.